What are Easy Tips to set Default Printer Windows 10 properly?
If you want to set up an HP printer on windows 10 using 123.hp.com/setup, you need to follow all the steps displayed on 123.hp.com/setup. First of all, you should open this link in your preferred browser and enter the model number of your printer in the displaying box. After that, you need to complete the next step suitably. Now, you need to begin the printing from a fresh printing machine. It can simply happen because of office or desk has changed or the network has changed. For easiness, you can set default printer windows 10 in the correct ways. It will be very easy and comfortable for you. If you’re using Windows 10 operating system with your HP printer, you need to set the default printer windows10. By launching the recent release of an updated version of Windows 10, Microsoft office has launched a fresh setting to set default printer windows 10. By doing it, you can easily use your printer for the printing process.
What is the real meaning of set as the default printer?
Many users don’t know how to set default printer windows 10. They don’t have ideas about this setup process. The setup process of the default printer is very simplified in which a default printer to complete the printing jobs, which are delivered that are not specified. Always remember, the default printer stops the program suitably from asking the printing machines to print every time when they look for printing any type of a document. Before set default printer windows 10, you need to complete the setup process of your printer using 123.hp.com/setup. After that, you can go to the next process.
Easy process to the setup default printer on windows 10-
Step1- In the first step, you need to go to the windows start menu button
Step2- In the second step, you need to hit on “settings” option
Step3- Thirdly, you need to hit on “devices” option in the “settings” displaying a dialog box
Step4- In the fourth step, you make sure that you’re in the field displayed as “printers and scanners” button
Step5- In the final step, you need to disable the settings and you need to visit “Let Windows manage my default printer” option with the help of choosing the button “off” correctly.
How windows OS helps to manage set default printer windows 10?
Your windows operating system helps to manage set default printer windows 10. You should perform the below steps in the appropriate ways.
Step1- You should hit on “print& share” button and after that, you have to hit on “set as default” button correctly
Step2- In the second step, you must open the registry editor correctly and hit on the key lagged as “HKEY_CURRENT_USER\SOFTWARE\Microsoft\Windows NT\Current Version\Windows”.
Step3- For the specific name, you need to choose the “LegacyDefaultPrinterMode” option and set the value data to 1 correctly to set the default printer windows 10 appropriately.
Easy Instructions to set default printer windows 10-
Windows 10 is technically capable to print any kind of documents using only one printing machine at one time. In addition, you can select the printing device correctly to print the documents. When you do not give the correct printing command to your printer, after that your windows will use the default printer. The default printer is not recognized as a specific printer device and no supplier provides a particular name since its launching. It is the most advanced and current printing machines that are sufficiently available on the network. If your printer machine is synced directly to your laptop, after that the printing machine is considered as a default printer. For set default printer windows 10, you must follow below technical instructions in the appropriate ways.
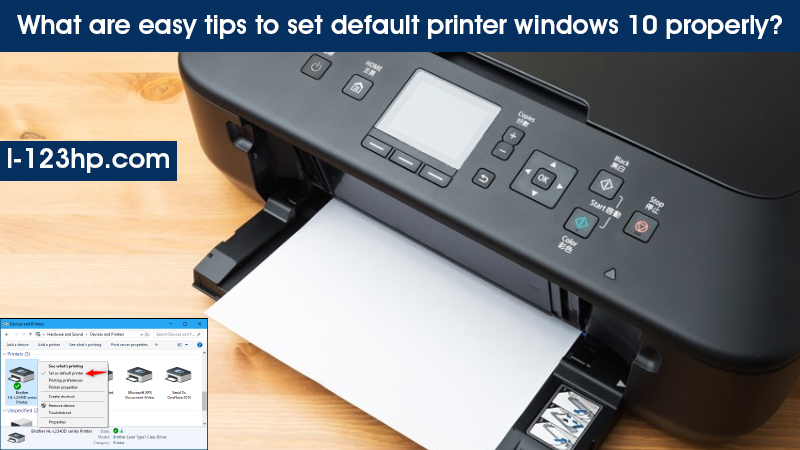
Step1- Initially, you need to open the “control panel” windows button
Step2- Secondly, you should hit on the mouse option on the screen to open the super-secret displayed menu and after that, you need to choose the “control panel” button
Step3- Under the section of hardware and sound button, and then you need to hit on the link displayed as “View devices and printers”.
Step4- In the next process, you will get the “Devices and Printers” window correctly.
Step5- Then, you should click on the printing device that you want to use as a default printer.
Step6- After completing the above instruction, you need to select as “set as default printer” command
Step7- Finally, you should wait for a few minutes and after that, your printer will be set default printer windows 10 successfully. It will be the right process of setting up a default printer on windows 10.
With the help of all these steps, you can easily set up a default printer on windows 10. The above-explained process is very easy and efficient in performing, so you can complete your set up process of the default printer. In the case of 123.hp.com/setup process, if you have any problems, you can discuss it with live technicians. Still, if you have any confusion, you can make the proper and complete conversion with the online technical support team.
Conclusion
If you want to set your printer as a default printer on windows 10, you need to follow the above-explained steps in the appropriate ways. These technical instructions are very simple in performing, so you can apply them easily for set default printer windows10. For any confusion, you can get the step by step guidance from live technical support professionals.
